


.jpg)

A few years ago I was approached by a fellow who had a Gibson Les Paul Recording Guitar which was a variation of the established model. Back in the early 1970s, Gibson began experimenting with new models such as the "Les Paul Recording." This model is often eschewed by guitar purists: considered too full of "gadgetry." The "Recording" featured low-impedance pickups, many switches and buttons, and a highly specialized cable for impedance-matching to the amplifier.
The instrument I received had a badly damaged finish. At one time someone had modified the instrument by removing the low impedance pickups and replaced them with traditional humbuckers. This entailed filling the original pickup cavities and re-routing new ones appropriate for the humbuckers.
As the instrument had no value in the condition that it was in, I proceeded to make it both playable and ascetically pleasing.
Below are a few of the steps in the progression of the rebuild.

 Note Black Binding on previously black guitar
(Radius Fretboard Sanding Block in Foreground) Sanding guitar body with random orbit sander
 Leveling & Sanding fingerboard (Frets Removed)
 Body spray painted with gloss black water based Hydrocote brand finish. Clearcoat Hydrocote sprayed as topcoat. Finish is "rubbed out" using a variety of abrasives from 'Micromesh' cloth to powdered abrasives such as Pumice and Rottenstone in water or paraffin oil. Final gloss is achieved with Meguier brand automotive finish compounds.
 Making sure hardware fits. Caution! A nice tight fit may be reduced in size due to the thickness of the finish used.
 Reverse of body (left) and laminated neck blank of an unrelated project.
 New White binding attached to channel on guitar edge with Acetone based plastic cement.
Binding secured with tape while glue dries. Rubbed Out Finish on reverse of body with contrasting white binding.
 Rubbed out front with new white binding
(Fingerboard protected by masking tape) Fret removal using soldering iron and pliers.
(Heat softens old glue and lessens wood chipping during removal) Coiled Bulk Fretwire and Fretwire Bender clamped in vice.
 Frets cut to size and ends of frets are "nipped" using special tool.
Nipped ends of frets allow frets to run over binding without passing through them. Using Band Saw to cut new electronics cavity cover
 Copper shielding glued into all electronics cavities to reduce extraneous electronic interference. Alternatively a metal particle paint can be used.
(extra contact cement ensures sticky copper back will adhere) Checking Neck Angle of Copper Shielded Guitar Body
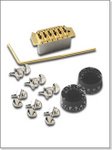
 Assembled Guitar with Gold Hardware.
 Potentiometers (Volume & Tone) & Selector Switch with Output Jack on underside of copper shielded control cavity cover.
(Cavity cover made four photos above) Front of Control Cavity Cover with 'Pot' Shafts Protruding.
 Assembled Guitar
 Final Guitar as Presented to Owner.
Sunday, 2 November 2008
Gibson Les Paul Recording Guitar Rebuild
Wednesday, 1 October 2008
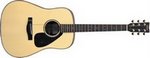
Acoustic Bass Guitar

Another Unfinished Project: An Acoustic Flat Top Bass Guitar based on a Martin Design. Guitar is assembled but requires fingerboard, saddle and finishing and hardware. So close yet so far away.
 Manual Bending of Guitar Sides on Bending Iron
(A Side Bending Jig was actually used)
 Various Wooden Components of Acoustic Bass Guitar in preparation
 Partially Assembled Parts:
 Front Spruce Top Joined and Thicknessed with Soundhole cutout;
 Joined Spruce Top Plate with Soundhole Cutout
 Bracing Ribs Glued & Clamped To Spruce Top
 Braces Trimmed with Chisels and Small Planes
 Guitar Sides Glued and Clamped (Joined) at End Block
 Sides at front Joined by Glue and Clamping to Neck Block
 Excess Side Wood Chiseled away to reveal Neck Block V-Pocket
(Alternatively Dremel Tool could be used)
 Side "Kerfed" Linings glued and clamped (high-tech clothes pins) to sides
(Linings provide strength and surface where to glue front and back plates.
 Truing Surface of Linings with Small Plane
 Truing Sides of back with Jointer
 Glued Back being double checked for Thickness with Caliper Guage
 Back Braces Glued and Clamped to Back
 Routing Channel in Back for Decorative Inlay Strip
(Strip covers glue joint strengthening it)
 Assembled Back& Sides
 Spruce Top Placed on top of Assembled Back & Sides
 Assembled Body with Neck in Foreground
 Assembled Body (with some violin making tools on right)
 Assembled Body showing Decorative Inlay Strip in Back
 Binding Material (Coiled) with Dremel tool and Binding Channel Attachement
 V-Joint Neck Attachment
 Dremel Router Readied to cut Inlay Logo Pocket
 ThunderHouse (THI) Logo Inlay Pocket Ready for Abalone Inlay
* * *
Read More!
![]()
Tuesday, 2 September 2008
Violin Construction

I have always been fascinated by the violin although if I place one under my chin and take a bow to it, the sound can best be described as "a symphony for cat & chainsaw"! My fascination starts with the artisans that defined and refined it's dimensions and structure. Names from Cremona Italy such as Stratavari, Amati and Guarneri inspire today's builders with their creations, both beautiful and functional throughout the ages. France, England and The Netherlands also contributed with their own styles and exquisite builders.
My wife is the genealogist in the family however my interest in the violin became elevated when I discovered that my great grandfather made violins in the old country of Latvia. Naturally I had to try my hand at it.
A few photos are posted below, far to few for a true photo essay, however, for the time being they are all that I can offer. "Shooting Board" with Jointer Plane used to true up Maple Plates for Back
 Variety of Wood Stock used in Violin Construction
 Maple clamped for alternate truing of gluing surfaces
 Plates glued and clamped in jig
(Wax Paper keeps glue from seeping) Glued up Belly & Back with ribs, neck block and mold for assembly
 Glued up Maple Back & Engleman Spruce Belly marked for cutting
 View of Several molds - top one with corner blocks & ribs attached
 Plate clamped to workbench for initial surface planing
 Sawn out plates with some contouring
 Planing of Surface of Plate
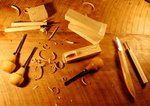
 Further Planing & Contouring with Finger planes
 (As Above)
 WorkBox: Wood shavings support wooden plate as contoured with finger planes
 Partially assembled body with Hot Hide Glue Pot in background
 Assembled Back with f-holes cut into belly and purfling insertion
 Purfling (Decorative & Strenghening Strip) inserted in channel at edge of violin plates
 Back, Sides and Belly ready for assembly
 Back and sides assembled with carved neck attached
 Checking Ebony Fingerboard angle against neck and body
  Belly glued and clamped to body
 Assembled Violin "In White"
 Assembled Violin
 Various carved Backs and Bellies of Violins
 Finished Stained and Varnished Violin
